From Zero to Hero: Coding a blog in Jekyll
learning tech-tutorials jekyll4 minute read
I’ve been asked quite a few times online for help on creating static sites with generators like jekyll and what are the best ways to host them. So, I have decided to write a series of blog posts that will detail how to fully create, setup and deploy your own static blog built with Jekyll. We will use a customizable theme and for hosting, we’ll go with Netlify’s free tier.
At the end of the series, our blog should have:
- a functional contact form
- an email newsletter
- a categories widget
- comments
- pretty much all the neat functionalities you can have on a blog.
We will initially set this up using free services or plans, but you can always upgrade if you need more features.
I am really excited about this and I hope you find the series useful. This post will explain how the site will work and how to install the software we will need.
What are static sites #
As opposed to dynamic websites, static sites do not use server-side scripting and they display the prebuilt files you host on the website. This means that the content shown to every user will be the same and that, technically, the website does not have a database (hosts like netlify provide ways to bypass this and even let you create contact forms that are then sent to you!). Static sites generators help you render dynamic content on your static webpage in a clean and efficient way.
Benefits #
Static sites are more quicker, more secure and much easier to code and handle than dynamic websites. Static site generators like Jekyll are more and more popular because of how simple they are to use especially with blogs.
We will be using Netlify because it provides tons of decent features in its free tier and has continuous deployment with Github.
Jekyll simplifies the efficient creation of beautiful static sites and runs on Ruby. It allows you to have absolute control on your blog without resorting to an often restrictive CMS like Wordpress.
Setup #
Prerequisites #
- Follow the instructions at Git version control tool from sections 1.1 to 1.6 if you don’t know what git is or if you haven’t already installed it.
- Github account
- Ruby programming language here
- Ruby package manager RubyGems here.
These are essential to using the Jekyll static site manager that allows you to efficiently code and design your website.
Now let’s run this command into your terminal to get Jekyll (keep in mind that this will only work if you have ruby and rubygems):
gem install jekyll bundlerThis command installs jekyll using the rubygems package manager which is like pip in python.
Alright, now that we’ve installed the necessary software, we can start working on our website.
jekyll new your_blog
cd your_blog
bundle exec jekyll serve
These commands tell Jekyll to create the skeleton structure of our blog in the “your_blog” directory using the base jekyll theme named Minima. We will use this simple yet sleek template to build our blog, step by step.
The last command then installs all extra gems required by jekyll and locally serves your website. If you go to https://localhost:4000 you’ll see the generated website.
 As you can see, the generated site already has a header, an about page, a footer and even one post. This is all part of the Minima theme which we will customize to our needs.
Github Repository and Hosting with Netlify #
We will be using the git version control to update and handle our website (check out this git cheatsheet if your knowledge of git commands is rusty).
Start by logging into your github account and creating a new repository by clicking the plus button in the top right corner. When prompted, select the following settings:
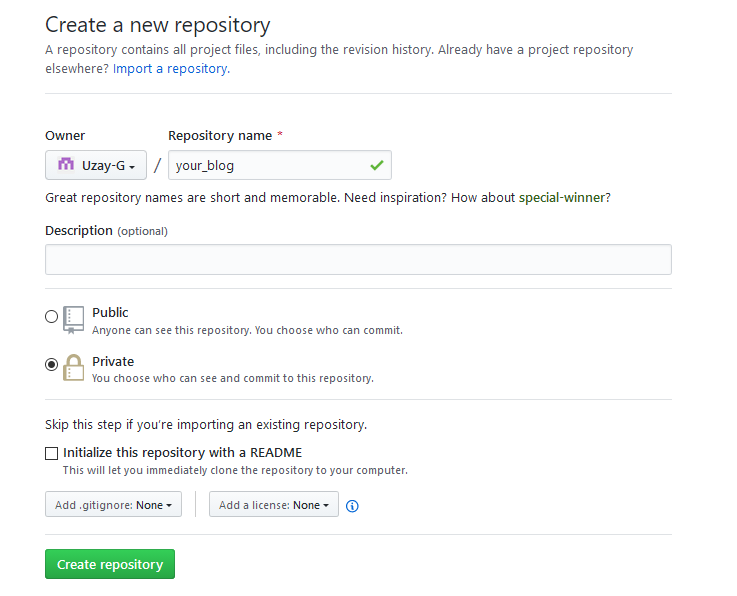
Then follow the instructions to create the repository from command line by entering the commands in your blog directory but instead of running git add README.md run git add .
Now that we have a working repository, we will want to actually host our site using Netlify. Sign up using your github account and then click the “New site from Git button”. Choose continuous deployment from Github, select your blog repository and pick these settings:

Finish it off by clicking “Deploy site”.
There we go!! The first deploy might take some time but when it’s completed, your site will be available online. For now, the website is merely a template. In part 2, we will customize it and explore how you can add posts.
If you encountered any problems, post a comment down below. You can subscribe to get an email whenever I add to the blog series.
Copyright © 2019-2026 uzpg
